 Working with the Speaker List
In this article:
Speaker List pane
The Speaker List pane of the Toolbox is where you create and manage the list of speakers for the current subtitle file.
The list may contain a maximum of 30 speakers.
The various elements of the Speaker List are shown below:
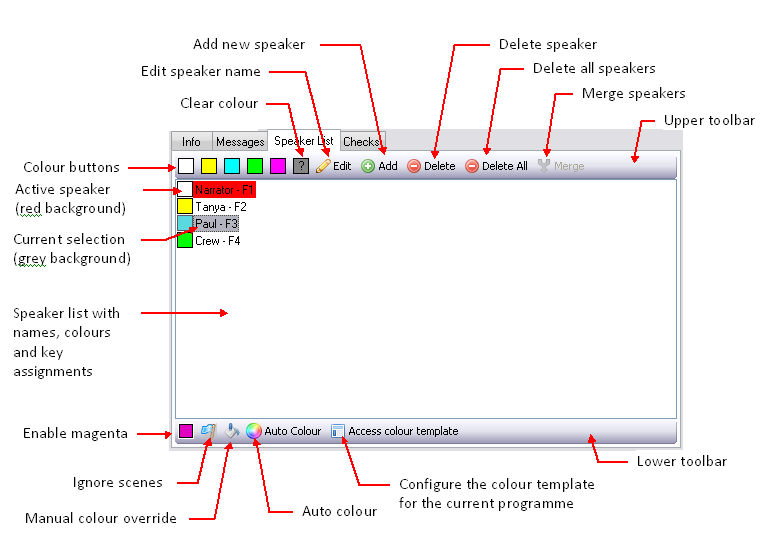
The Speaker List pane is divided into three elements: The upper toolbar (used to manage the speaker list), the speaker list itself and the lower toolbar (used to control the autocolouring settings).
The currently selected speaker (for managing the Speaker List) is shown with a grey background, i.e. "Paul" in the above illustration.
The active speaker (i.e. the speaker to which the text at the current cursor position is, is the active speaker will also be displayed on the Video Window.
Each speaker has an F key assigned as shown. Pressing an F key whilst the Speaker List pane is active will have the following effect during subtitle editing/creation:
-
If the edit focus is in the current subtitle - the speaker corresponding to the F key will be assigned to the text at the current cursor position
-
If the edit focus is in the SpeakTitle Window - starting from the next spoken sentence, the speaker corresponding to the F key will be used
Pressing an F key that has no speaker currently assigned to it will create a new speaker.
Managing the Speaker List
This topic describes how to navigate the Speaker List and create, rename and delete individual speakers, as well as merging two speakers together.
The controls for managing the speaker list are located in the upper toolbar.
Navigation
You can access the Speaker List and its various buttons using both mouse and keyboard commands.
Using the mouse:
-
Click on a speaker to make it the current selection
-
Click on any of the toolbar buttons to activate
Using the keyboard:
-
Move the focus to the Toolbox pane by pressing the Esc key until the top of the Speaker List tab is highlighted in orange
-
Use the Tab key to switch focus between the upper toolbar, speaker list and lower toolbar. The currently selected toolbar button is indicated by a "yellow square" background. The currently selected speaker is indicated by a grey background
-
Use the Arrow keys to select a particular button or speaker
-
Press the Space key To activate the selected button
Add a new speaker
To Add a new speaker, press any unassigned F key or click the Add button on the upper toolbar. A new speaker will be added to the bottom of the list as shown below:

The new speaker is created with a default name and with no colour assigned, as indicated by the grey "question mark" icon.
Note that the text at the current cursor position will immediately be assigned to the new speaker.
New speakers are normally appended to the end of the list. However if a speaker is deleted and a new one added, the new speaker will be inserted in the position of the previously deleted speaker. The order of speakers in the list cannot be changed.
Assign a colour to a speaker
To assign a colour to the currently selected speaker, click the corresponding colour button on the upper toolbar. To set a speaker's colour to "unassigned", use the clear colour button.
Rename a speaker
To change the name of the currently selected speaker, click the Edit button on the upper toolbar.
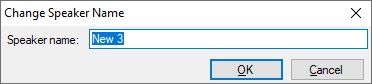
Enter the new name into the box and click on OK. Speaker names are case-insensitive. Duplicate speaker names are not permitted.
Delete a speaker
To delete the currently selected speaker, click the Delete button on the upper toolbar. Use the Delete All button to delete all speakers in the file. A confirmation message will be displayed. Note that when a speaker is deleted, any subtitle text assigned to that speaker is automatically de-assigned.
Merge two speakers
To merge two speakers together, select the first speaker, then hold down the Ctrl key and select the second speaker. The Merge button on the upper toolbar will be enabled. Click the Merge button and confirm the operation. The second speaker will be deleted and their associated text will be assigned to the first speaker.
Colour templates
Wincaps Q4 allows you to create a colour template for each programme defined in the system. This allows you to pre-define the names of any speakers that appear regularly on the programme and assign colours to them. Then whenever a new job is created for that programme, the speaker list will be automatically populated with the information in the colour template.
Use the following steps to create or modify the colour template for a programme:
-
Open a subtitle file that has the programme assigned
-
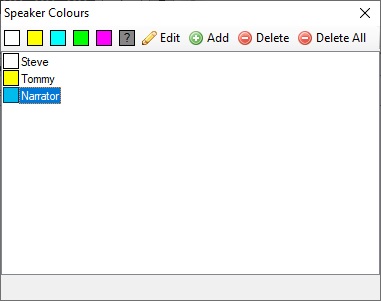
Click the Access colour template button in the lower toolbar of the Speaker List pane. The Speaker Colours dialog is displayed as shown below:
-
Create and/or modify the list of speakers and assign colours via the toolbar which functions in a similar way to the upper toolbar in the main speaker list.
-
Click on the red X in the upper right-hand corner of the dialog to close it and save your changes. The colour template will be saved with the other programme information in the DataStore.
The next time you create a new job for that programme, the speaker list will be populated automatically from the new colour template.
Note: There is currently no way to apply a modified colour template to the current subtitle file. Changes made to a template will only be applied when a new file is created using that programme.