Set position and justification
In this article:
![]() Lock position and justification
Lock position and justification
![]() Positioning multiple subtitles
Positioning multiple subtitles
Overview
This topic describes how to change the position and justification of individual subtitles, overriding the file default settings.
The positioning of the subtitles on the screen can be specified in three ways:
-
Justification – the alignment of one row with another within a subtitle
-
Horizontal position - the alignment of the longest row of the subtitle horizontally across the screen
-
Vertical position - the vertical position of the whole subtitle block on the screen
You can use the layout toolbar or a positioning keystroke to quickly set the position or justification of the current subtitle to one of the standard choices. The arrow keys can be used to set custom positions, allowing you to position each row separately anywhere on the screen.
You can choose to lock the position and justification keys together.
You can use the Compact View to set the position and justification of multiple subtitles at once.
Subtitles can be raised (to a configurable position) and dropped via a single keystroke.
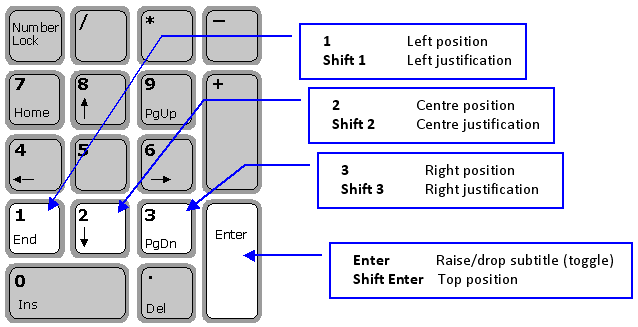
Standard positions
The layout toolbar shows you the position and justification of the current subtitle as indicated by the yellow borders around the buttons. You can hover the mouse over the buttons to learn what each one does.
![]()
Click a button to change the position and/or justification of the current subtitle as desired, or alternatively use the corresponding keystroke on the numeric keypad as shown below:
Lock position and justification
The lock button ![]() can be used to tie position and justification together. When this option is enabled, pressing a justification or position key will set both position and justification to the chosen value (left/centre/right). This option can be preset via the customer template if required.
can be used to tie position and justification together. When this option is enabled, pressing a justification or position key will set both position and justification to the chosen value (left/centre/right). This option can be preset via the customer template if required.
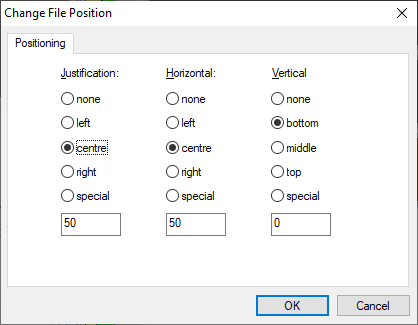
You can also change the position for the current subtitle by right-clicking on the subtitle and selecting Position and justification... from the pop-up menu. The Change Subtitle Position dialog is displayed.
Custom positions
You can use the four Alt Arrow keys (up/down/left/right) to move a subtitle or its individual rows to any position on the screen.
-
Alt Arrow - move subtitle 1 pixel/1 Teletext character/4 Closed Caption characters
-
Ctrl Alt Arrow - move subtitle 10 pixels/2 Teletext characters/1 Closed Caption characters
-
Shift Alt Arrow - move current row 1 pixel/1 Teletext character/4 Closed Caption character
-
Ctrl Shift Alt Arrow - move current row 10 pixels/2 Teletext characters/1 Closed Caption characters
To move an individual row (and hence create a split subtitle), first place the cursor anywhere on that row.
Raising subtitles
Subtitles are normally positioned at the bottom of the screen. However you sometimes need to raise a subtitle slightly, e.g. so that it doesn't obscure burnt-in captions. Similarly, if subtitles are positioned at the top of the screen it might be necessary to move them down slightly.
The Enter key on the numeric keypad provides a quick way of doing this.
-
If the subtitle is at the bottom of the screen, press Enter to raise the subtitle to the bottom of screen raise position. If the subtitle is already raised (i.e. not at the bottom of the screen) then pressing Enter will return it to the bottom of the screen.
-
If the subtitle is at the top of the screen, press Shift Enter to drop the subtitle to the top of screen drop position. If the subtitle is already dropped (i.e. not at the top of the screen) then pressing Shift Enter will return it to the top of the screen.
The raise and drop positions are configurable on a per-customer basis.
The raise keystroke can be configured as a user preference if desired.
Positioning multiple subtitles
To quickly change the position and/or justification of multiple subtitles, first switch to the Compact View and select the subtitles to change. Then use the toolbar and/or keystrokes as described above. Note that you can't use the Arrow keys to customise the position of multiple subtitles.
You can also make more detailed positional changes in the Compact View using the Right click Edit Properties menu.
Examples
The following examples illustrate the various positioning and justification settings.
Left position, left justification
![]()
Left position, centre justification
![]()
Left position, right justification
![]()
Centre position, left justification
![]()
Centre position, centre justification
![]()
Centre position, right justification

Right position, left justification

Right position, centre justification
![]()
Right position, right justification
![]()
Top position

Middle position

Custom position (via Alt Shift Arrow keys)