 Timing Rules
This article describes how to use the Timing Rules from the perspective of off-line subtitling. Click here to learn how the Timing rules are applied when capturing timecodes during live subtitling.
In this article:
Overview
When a timecode is grabbed manually or is generated automatically by text-to-speech alignment, Wincaps Q4 can run this timecode through a set of rules to optimise its relationship to shot changes and adjacent subtitles. These Timing Rules are normally defined as part of the customer template and will be initialised automatically if the correct customer is selected when the subtitle file is first created.
The Timing Rules are designed to summarise all of the various “pulls” on a timecode based on its relationship to shot changes, other subtitles and the effect on reading speed and duration. The rules are applied every time a subtitle timecode is changed, other than when that change is signalled as being explicit (i.e. it overrides the rules) or an offset is being applied. So (for example) if the Aligner creates timecodes based just on speech alignment, they are then run through the Timing Rules. If you grab a timecode or click and drag a subtitle or one of its edges in the Timeline View, the change will be run through the Timing Rules unless you hold down the Ctrl key to signify it as being explicit. If you type in a timecode value, or nudge an existing value, it will be regarded as an explicit change and not subject to the rules.
Because there are a number of possibly competing factors involved, the Timing Rules are applied in sequence and the end result is often a compromise between different parameters. It is not of course mandatory to have all the rules enabled, and you can if you wish restrict the items which are in play.
![]() Refer to the Timing Rules Reference Manual for details of how the timing rules are applied
Refer to the Timing Rules Reference Manual for details of how the timing rules are applied
Whenever Wincaps Q4 applies the Timing Rules to a timecode, it logs a narrative in the Messages pane of the toolbox explaining the changes that have been made. This narrative can be helpful in order to understand why the Timing Rules were applied in a particular way.
![]() See an example of a Timing Rules narrative with explanations
See an example of a Timing Rules narrative with explanations
Configuration Dialog
To configure the Timing Rules for the current file, click the Timing rules button in the File Properties section of the Toolbox->File Info tab. The Timing Rules Configuration dialog is displayed:
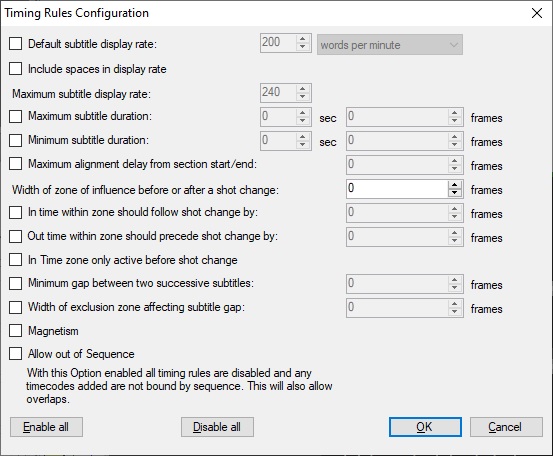
Individual rules can be enabled or disabled using the checkbox to the left of the name. Enable all and Disable all switch all rules on or off, except with the Allow out of Sequence.
Enable all will tick every box EXCEPT Allow out of Sequence.
Disable All will disable EVERY option, including Allow out of Sequence.
![]() Note that in Edit Mode, Wincaps Q4 always prevents you from changing a timecode if it would cause the subtitle to go out of sequence or have a zero or -ve duration. For example, you cannot change the In time of a subtitle if it would precede the In time of the previous subtitle or exceed the In time of the next subtitle. This situation applies even if all the timing rules are disabled, however if the Allow out of Sequence option is ticked the Timing Rules will all be disabled and a timecode can be set out of sequence.
Note that in Edit Mode, Wincaps Q4 always prevents you from changing a timecode if it would cause the subtitle to go out of sequence or have a zero or -ve duration. For example, you cannot change the In time of a subtitle if it would precede the In time of the previous subtitle or exceed the In time of the next subtitle. This situation applies even if all the timing rules are disabled, however if the Allow out of Sequence option is ticked the Timing Rules will all be disabled and a timecode can be set out of sequence.
Reading Rates
Default subtitle display rate sets the target reading rate in words per minute or characters per second/minute. Wincaps Q4 uses this value to determine the optimal display time (duration) of each subtitle. Note that the ideal time is not always attainable since it may need to be modified to comply with shot changes and/or the timing of surrounding subtitles. If the reading rate is disabled, a default value of 200 wpm is used to calculate floated out times where necessary. This value is used by the default rate check to identify any subtitles that exceed the default rate.
Include spaces in display rate determines if spaces in the subtitle text are included in the reading rate calculations. Note that this option has no effect when calculating the word rate during live transmission in Q-Live, i.e. spaces are never included in this situation.
Maximum subtitle display rate controls the size of the steps between green (excellent), yellow, orange and red (too fast) in the colour background to the subtitle reading rate display. The colour bands are calculated as follows, where d = the value of default display rate, m is the value of maximum display rate and step = (m-d) / 3. The example numbers are based on a default rate of 200 wpm and a maximum rate of 240 wpm. Values are rounded to the nearest integer.
|
Colour |
Meaning |
From |
To |
Example From |
Example To |
|
Cyan |
low |
0 |
(d - 10%) - 1 |
0 |
179 |
|
Green |
excellent |
d - 10% |
(d + step) - 1 |
180 |
207 |
|
Yellow |
average |
d + step |
(d + (step x 2)) - 1 |
213 |
226 |
|
Orange |
poor |
d + (step x 2) |
m |
227 |
240 |
|
Red |
too fast |
m + 1 |
and up |
241 |
and up |
The maximum rate value is also used by the maximum rate check to identify any subtitles that exceed the maximum rate.
In Q-Live, this value sets the maximum transmission rate for subtitles in the transmission queue.
Whenever you change the default rate, the maximum rate will be automatically set 20% higher than the new default. If you want to set a different maximum rate, you can change it without affecting the default. Note however that it is not possible to set the maximum rate less than the default rate.
If the Use ideographic timing option is enabled, which is only available for languages that use ideographic characters, the reading rate calculation is adjusted so that each character is the equivalent of a word.
Subtitle Duration
Maximum subtitle duration and Minimum subtitle duration allow you to set an upper and lower limit for the display time in seconds/frames and are applied after the display rate has been calculated.
Aligner
Maximum alignment delay from section start/end defines the amount that an automatic alignment is allowed to drift from the section markers that set the start and end times for the aligned sequence. For more details see the topic on Using the Aligner.
Shot Changes
Width of zone of influence before or after a shot change defines the distance over which a shot change will exert a “snap to” pull on the In or Out time of a nearby subtitle.
Two values allow you to configure the number of frames that an In time... should follow or an Out time... should precede a shot change that causes the timecode to snap to it. The option In Time zone only active before shot change is to allow the timing rules to work only with In Time as per the Netflix timing rules.
Minimum Gaps
Minimum gap between two successive subtitles corrects the timecodes to ensure that the specified number of clear frames are left between adjacent subtitles. Width of exclusion zone affecting subtitle gap defines the gap which is not allowed, i.e. either the gap must be the specified minimum value or it must be greater than the exclusion zone value.
Note that the minimum gap rule is not applicable to Closed Caption personality files.
Magnetism
The Timing Rules also incorporate implicitly the concept of magnetism: Two subtitles which are separated by the minimum gap behave as if they are magnetised, such that if the Out time of the first or the In time of the second subtitle is changed (within reason), the other subtitle will follow it and maintain the same spacing. Magnetism is enabled by default but can be turned off if desired. If this is done then edge-moves and whole-subtitle moves are no longer magnetic, though the minimum gap rule will still be applied if enabled.
Out of Sequence
Allow out of Sequence allows subtitle timings to not be constricted by the timing rules stopping the setting of timecodes out of sequence.