 Getting started with Q-Live
First steps
![]() Working with stories in the N32 document
Working with stories in the N32 document
![]() Selecting the Output Device and Live Display Mode
Selecting the Output Device and Live Display Mode
First Steps
Start the Q-Live application by double-clicking its desktop icon. After a short pause the main window appears as shown below:

There is a menu bar at the top, and depending on your preferences there may be toolbars beneath the menu bar.
To achieve the layout as shown above, select the Configure menu item, choose Toolbars and enable All. This will cause both toolbars to be displayed while you are learning the system.
If you are using Q-Live as part of a multi-user system you will need to configure the location of the Wincaps Q4 File Server via the Configure : File Server menu. Your system administrator should be able to provide you with the location of this module.
![]() To produce the best results when subtitling with Q-Live, no other software applications should be open on the PC. Dragon can be used with Q-Live but we recommend extra RAM if doing so.
To produce the best results when subtitling with Q-Live, no other software applications should be open on the PC. Dragon can be used with Q-Live but we recommend extra RAM if doing so.
![]() Q-Live and Q-Live Services must always be the same version.
Q-Live and Q-Live Services must always be the same version.
If you are using a central Datastore, you can configure the path to the Datastore, using DataStore : Datastore Server
This will display the Configure Datastore dialog:
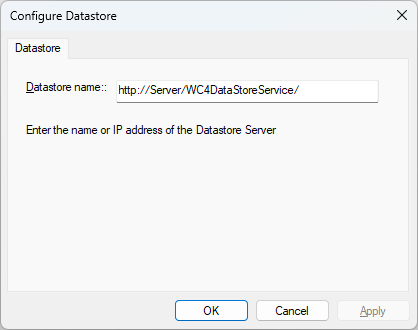
Datastore path will need to be in this format:
http://DatastoreServerMachine/wc4DataStoreService
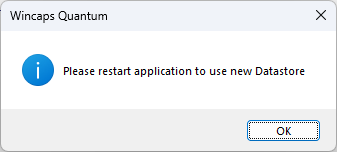
Any change will require a restart of Q-Live:
Creating a New file
To start working with Q-Live, you need to open or create a .N32 subtitle file. To create a new file, select the File menu and choose New. Give the file a name (for example LiveSubtitleFile) and click Save.
Q-Live creates the file and then offers you the opportunity to specify the Programme, Customer and Language.
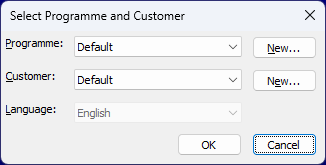
This information is used to access the knowledge base for any specific spellings related to the programme, and to set the display style and timing preferences related to the customer. For now, click OK to use the default settings. We will return to these items later.
The screen now displays the basic “empty file” as shown below:

Wincaps Q-Live allows you to have more than one file open at a time. When you have multiple files open you can switch between them by clicking on the file tabs located directly above the Video Window as shown below.

![]() It is recommended that no more than three files be opened at any one time due to processing restrictions on a typical PC workstation.
It is recommended that no more than three files be opened at any one time due to processing restrictions on a typical PC workstation.
The screen layout consists of three main areas: the media area (top left), the Toolbox (bottom left) and the subtitle and timeline display area (right).
The subtitle display area on the right has three different Views: News View, List View and Compact View. You can switch between them by clicking on the tabs or via the Alt 1/2/3 key presses. Most of the time you will be working in the News View.
The Toolbox area in the bottom-left has a number of tabs that provide access to configuration and control settings as well as utilities including find and replace.
![]() Learn more about the screen layout
Learn more about the screen layout
Text splitting
Q-Live has the ability to perform intelligent Text Splitting. With good text splitting rules configured, imported text is automatically split into sensible subtitles to save time and effort. Text splitting information (along with many other things such as templates and House Styles) is held in the Wincaps Q4 DataStore. If your system has a Main DataStore then this data is shared between all users of the system and the text splitting rules should have already been configured by your system administrator. If not, you will need to import and configure the text splitting files in order to take advantage of this feature.
![]() Learn more about configuration options
Learn more about configuration options
File settings
In the Toolbox, click on the Info tab and then on the File Info tab (in the vertical list). The buttons in the File Info pane allow you to configure the subtitle file in various different ways to match your requirements. Particular attention is drawn to the following items:
-
Personality – most live subtitling for the deaf and hard-of-hearing (same language) uses the Teletext personality. However Q-Live also allows the same file to contain Open Subtitles (e.g. those intended for translation) – simply tick the option box on the Teletext personality.
-
Timing Rules – these apply to live subtitling as well as offline and subtitles will automatically clear according to these rules – it is therefore suggested that you set the minimum duration rule to a longer value than would be normal for offline, in block mode a new subtitle cue automatically clears the preceding subtitle regardless of this setting.
-
Position – you may prefer to adjust the default vertical position so that live subtitles appear consistently higher than normal, in order to avoid obscuring “lower-third” graphics, although position can also be easily adjusted during a live subtitling session. If using scroll mode then left horizontal position and justification is forced.
-
Number of rows – this is set using the “Punctuation & Size” button and automatically limits the maximum number of lines in a live or cued subtitle (with the split determined according to the active text splitting rules).
You can experiment with these settings or alternatively leave them set to the defaults for now. These settings (and many others) can be placed into a Customer Template so that new files created with that template will automatically use the desired settings. You may wish to create specific templates for news/live files in due course.
![]() Learn more about how to configure file properties and preferences
Learn more about how to configure file properties and preferences
Modes
Q-Live has several Working Modes, each mode is used for a different aspect of the live subtitling process. Control of this functionality is centred on the Mode toolbar located at the top right of the screen:
![]()
There are three modes that are used in Live subtitling, namely:
-
Edit - used to manage the running order and prepare subtitles prior to transmission (F5)
-
Fix - used to quickly capture timecodes from a video clip for subsequent live replay (F6)
-
Live - used to transmit the subtitles (F9) - only enabled when an output device is selected
You use the Off Air/On-Air button (F10) to toggle connection to the live output device.
![]() Learn more about Modes in Q-Live
Learn more about Modes in Q-Live
Working with stories in the N32 document
The N32 document groups subtitles into stories. The list of stories is referred to as the running order.
You will now learn how to create a new story and enter some subtitle text.
Choose the List View and select Edit Mode. Press F2 to create a new story.
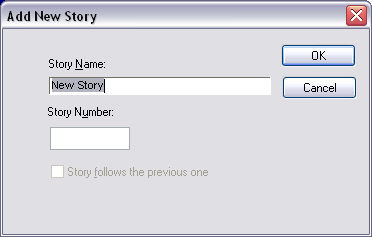
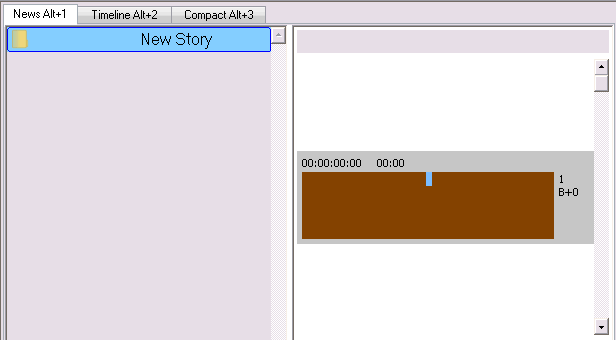
The Story Name and Story Number are for ease of reference. The running order is determined independently of the Story Number, however the tick-box allows a sequence of stories to be linked so that running order changes do not affect the sequence within such a group of stories. Click OK to create the new story. The subtitle document will appear as shown below.
The brown area is called the current subtitle. This is where you create and format the subtitle text.
You can now create the subtitles for the new story using any of the available methods. These include typing in text via the keyboard, speech input, pasting text from the clipboard or inserting text from another file.
Although timecodes are displayed there is generally no need to enter timecode values for live programming if the subtitles are to be cued manually (as is normally the case). However stories can also be treated as off-line subtitling projects (press 5 on the numeric keypad to associate a media file with the story). Stories can then be saved in a variety of file formats using the Story : Export menu. Alternatively the whole rundown may be saved as a single file via the File : Export : Bulletin menu.
Some useful keystrokes when working with stories are shown below. Many of these commands are also available on the Story menu.
|
Keystroke |
Action |
|
Page Up/Down or |
Select previous/next subtitle |
|
Alt PageUp/Down |
Jump to previous/next story |
|
Ctrl PageUp/Down |
Jump to first/last subtitle in current story |
|
Shift PageUp/Down |
Move the current story up/down the running order |
|
F2 |
Add story (after current story) |
|
Shift F4 |
Delete current story |
|
Shift F7 |
Rename current story |
|
Ctrl T |
Toggle Teletext/Open-caption (if enabled in Personality) |
|
Enter (numpad) |
Raise/drop subtitle ad bottom of display |
|
Shift Enter (numpad) |
Raise/drop subtitle at top of display |
![]() Learn more about working with stories
Learn more about working with stories
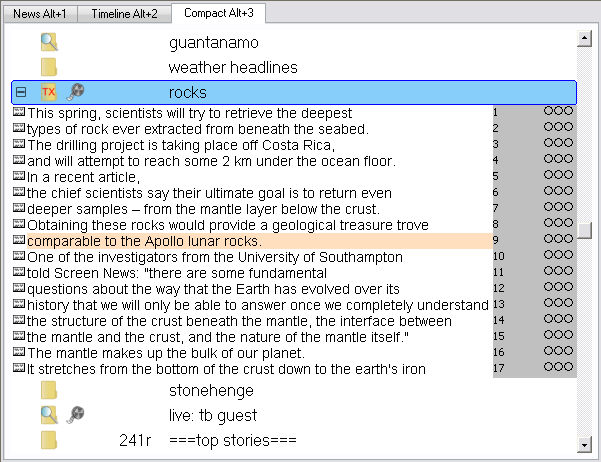
You can switch to the Compact View (press Alt+3) to perform functions involving a range of subtitles, such as large colour blocks, block delete/copy etc. The right-click menu while pointing at the subtitles includes a number of common commands.
![]() Learn more about the Compact View
Learn more about the Compact View
Selecting the Output Device and Live Display Mode
Once you have created a story containing some subtitles, you can use Live Mode to send the subtitles to air. Before you can do this, you must first select an output device and configure the live settings. Select the Live pane of the Toolbox (bottom left) and click on the Configure button to set the IP address or name of the destination Gateway machine and live transmission mode (multi-row/pop-on block display, word-by-word scrolling text or a combination of block and scroll.)

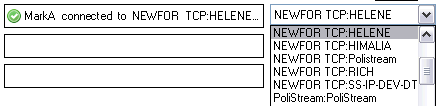
The Q-Live Gateway is a separate software module that manages the connections between the Q-Live clients and the transmission output devices (e.g. Teletext inserters). If the Gateway is running on the same PC as your Q-Live client, you can simply enter localhost as the gateway name. If the Gateway is running on another machine, ask your system administrator for details of what to enter here.
Once connected to the Gateway, you can select the target output device (or group) from the drop-down list of devices available on that Gateway. If the list of devices is empty then connection to the Gateway could not be made, consult your system administrator for advice.
You should leave the Live pane of the Toolbox selected during a live subtitling session (not necessary during pre-broadcast preparation or secondary user preparation/edit-only use).
Once you have chosen a device, you can press F10 or use the On Air/Off Air button in the Mode toolbar to toggle the live connection to the output device. The button text changes to On-Air if connection is made successfully. If it changes to Failed then connection could not be made to the output device, consult your system administrator for advice.
![]() Learn more about the Q-Live Gateway and output devices
Learn more about the Q-Live Gateway and output devices
Live Subtitling
Press F9 to enter Live Mode to cue prepared subtitles or send live subtitles using typing or speech recognition. Press F9 again to cancel Live Mode and return to Edit Mode.
When you are ready to transmit, press F10 to connect to the output device.
Cueing prepared subtitles
Place the cursor in the first subtitle that you wish to transmit. Listen to the programme audio and press Ins on the numpad at the appropriate time to send the current subtitle to air and advance to the next subtitle. The transmitted subtitle clears down automatically when replaced by the next subtitle or according to the set timing rules.
Press Del on the numpad to clear the subtitle manually if desired.
The video window always shows the appearance of the currently on-air subtitle.
In block mode, the current subtitle is transmitted as soon as you press Ins and the previous subtitle will be cleared.
In word scroll mode, the words are placed in a queue and transmitted according to the configured display rate. If you cue the subtitles too quickly then words will build up in the queue. The current size of the queue is shown in the Live pane of the Toolbox:
In Scrolling Block mode the text is sent out word-by-word according to the reading rate until the block is full. Cueing the next subtitle block will release the text word-by-word when the reading rate clears the previous subtitle block.
You can control the colour and vertical position of the transmitted subtitles via simple keystrokes.
![]() Learn more about cueing live subtitles
Learn more about cueing live subtitles
Live Replay of timed stories
You can attach a pre-recorded video clip to a story and use it to create and time the subtitles. Then when the clip is broadcast, you can play out the subtitles with a single key press using Live Replay.
Real-time/live subtitles
Live Mode is also used to generate and send unscripted subtitles such as live reports or interviews. In this case, the subtitle text is normally generated by respeaking.
Q-Live is optimised for live subtitling using the re-speaking method with integrated speech recognition provided by Dragon Naturally Speaking. There is no need to run Dragon or its toolbar when using Dragon with Q-Live.
Some features do not work with other versions of Dragon, for which the Dragon toolbar is needed.
It may be necessary to configure the system to use the correct interface: SpeakTITLE only or integrated Dragon support. This is done in the Configure pane of the Toolbox using the Speech button in the General Preferences section.
The SpeakTITLE interface window with Dragon integration is shown below:

Text delivered from Dragon appears in the SpeakTITLE window as it is released by Dragon and from there it is passed immediately into the current subtitle (after application of any applicable House Styles), from where it is transmitted as individual subtitle blocks or word-by-word according to the Live Mode configuration and timing rules.
Q-Live allows a second user to optionally correct the spoken text via the keyboard before it is released for transmission.
Most of the features and functions of Q-Live also have keyboard shortcuts to help speed up the process. There is a separate document installed with Q-Live and it can also be found in the Help document:
Keyboard Shortcuts for Q-Live.
![]() Learn more about respeaking live subtitles
Learn more about respeaking live subtitles
Newsroom Interface
Wincaps Q-Live can be used with Wincaps Q-News to interface to a Newsroom System. Q-News mirrors the newsroom system (e.g. iNEWS or ENPS) to display runorders and story scripts in the newsroom system.
Q-News will create the N32 file which can then be opened in Q-Live.
Q-News automatically updates story scripts, adds new stories and tracks changes in the running order - with all updates immediately visible in the associated N32 file in Q-Live.
![]() Note: If a Q-Live client is connecting to the Q-Live File Server via a VPN, the PC/Laptop should use a wired connection to the Router and use the IP Address of the File Server. Multi-user editing is NOT supported.
Note: If a Q-Live client is connecting to the Q-Live File Server via a VPN, the PC/Laptop should use a wired connection to the Router and use the IP Address of the File Server. Multi-user editing is NOT supported.
![]() Learn more about working with a Newsroom System
Learn more about working with a Newsroom System