 Getting started with Q4 Offline
![]() Using the Aligner (Pro licence only)
Using the Aligner (Pro licence only)
Overview
This section details the steps to start working with Wincaps Q4. See also the Wincaps Q4: Getting Started video on the BroadStream website. See also the walkthrough videos on YouTube.
Starting Q4
Start Wincaps Q4 by double-clicking the desktop icon or clicking on Wincaps Q4 from the the Search box in Windows. After a short pause the main window appears:
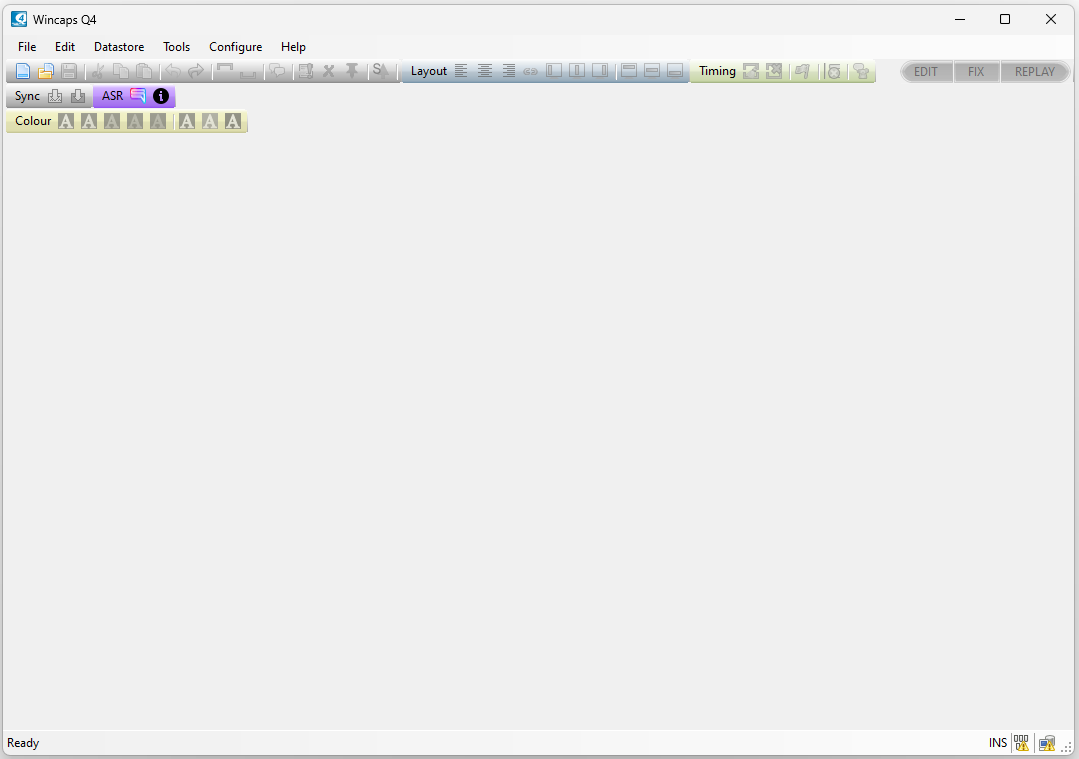
There is a menu bar at the top, and depending on your preferences there may be toolbars beneath the menu bar.
To achieve the layout as shown above, select the Configure menu item, choose Toolbars and enable All. This will cause both toolbars to be displayed while you are learning the system.
Configuring File Paths
To set your preferred path for media files, select the Configure menu item again and choose Default paths...
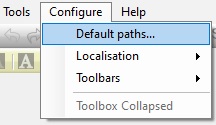
Either browse to the location of your media files or fill in the preferred default path.
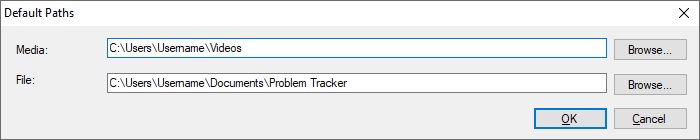
Configuring The Datastore
If you are using a central Datastore, you can configure the path to the Datastore, using DataStore : Datastore Server
This will display the Configure Datastore dialog:
Datastore path will need to be in this format:
http://DatastoreServerMachine/wc4DataStoreService or
http://DatastoreServerIPAddress/wc4DataStoreService
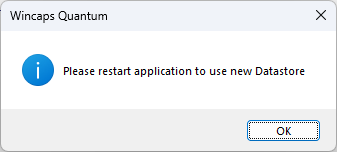
Any change will require a restart of Q4:
Create a new file
To start working with Q4, you need to open or create a .W32 subtitle file. To create a new file, select the File menu and choose New. Give the file a name (for example SubtitleFile) and click Save.
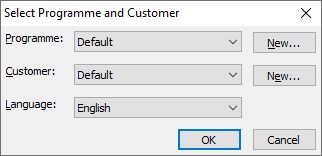
Wincaps Q4 creates the file and then offers you the opportunity to specify the Programme, Customer and Language. This information is used to access the knowledge base for any specific spellings related to the programme, and to set the display style and timing preferences related to the customer. For now, click OK to use the default settings. We will return to these items later.
The system then opens a file browser labelled Select Media File. Navigate to the media file that you want to subtitle and click Open. Follow the steps to index the media file if necessary. When indexing is complete, the screen displays the basic “empty file” as shown below:
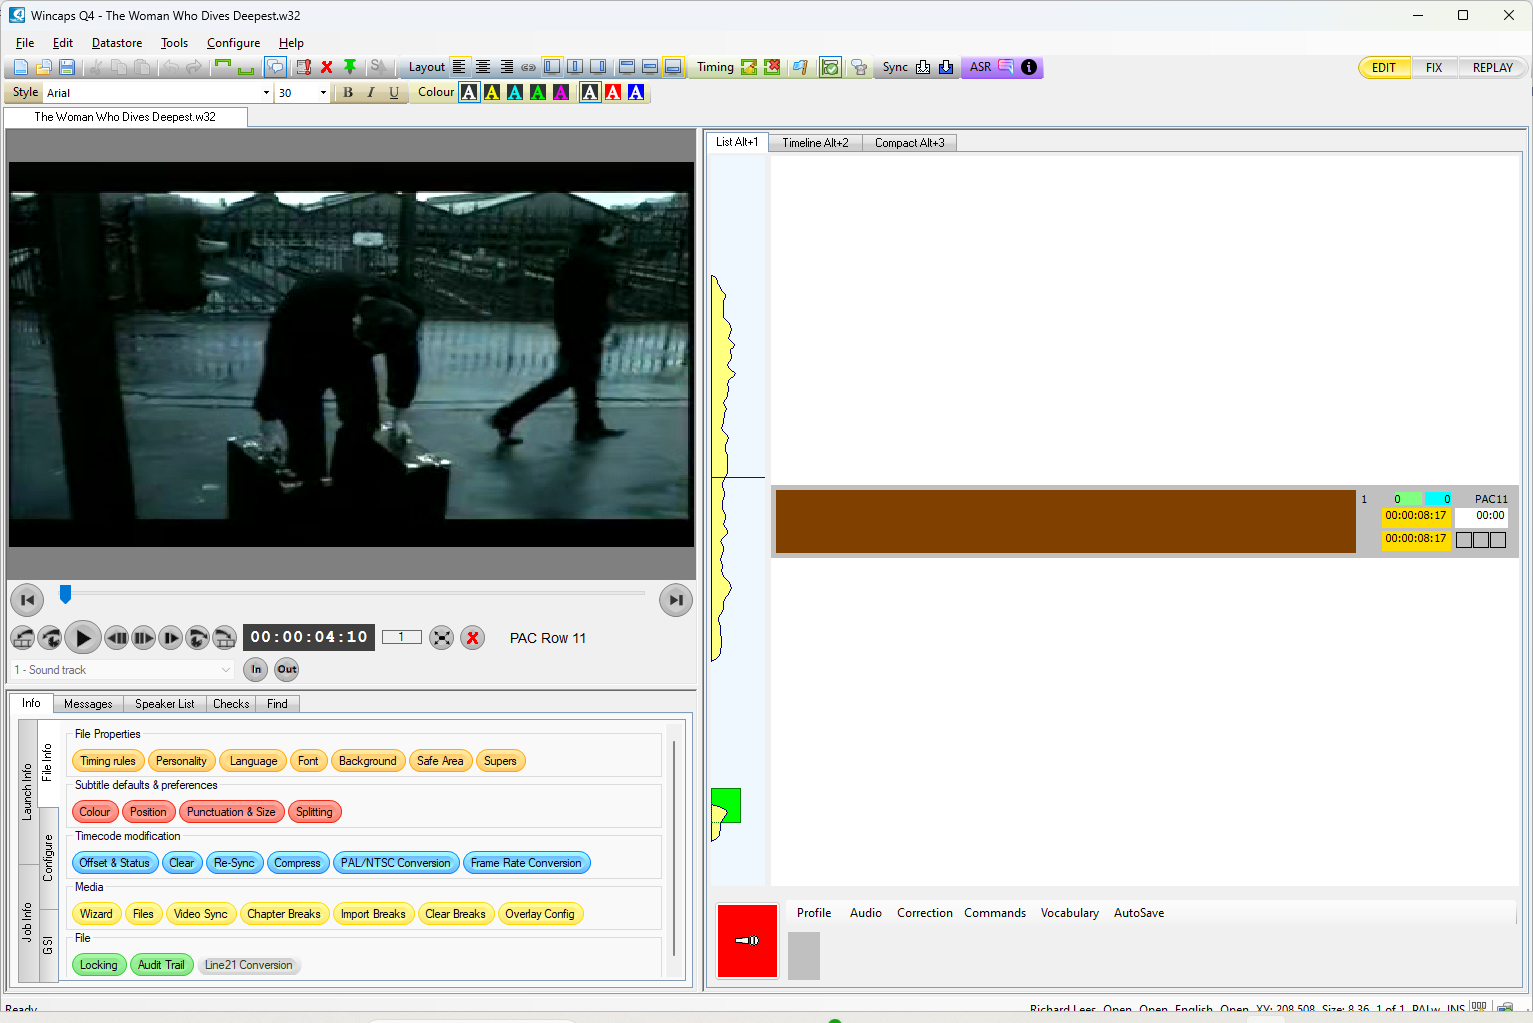
When a file is open, the screen layout is divided into three main areas: the media area (top left) , the Toolbox (bottom left) and the subtitle and timeline display on the right.
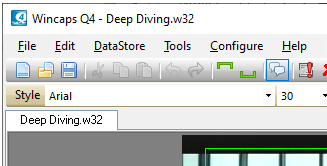
Q4 allows you to have more than one file open at a time although it is recommended to have a limit of three files open at any one time. When you have multiple files open you can switch between them by clicking on the file tabs located directly above the Video Window, as shown below.
Most of the features and functions of Wincaps Q4 also have keyboard shortcuts to help speed up the process. There is a separate document installed with Wincaps Q4 and it can also be found in the Help document:
Keyboard Shortcuts for Wincaps Q4.
User preferences
With a file open, you can configure your keyboard and other preferences. Select the Configure tab to the left of the Toolbox, and click on the mauve button labelled Keyboard.
![]()
Select whether you prefer to manually grab timecodes using the Numpad Ins/Del keys on their own, which means you need to use Shift Ins/Del to mark sections; or whether you prefer to mark sections using the keys on their own, in which case you use them with Shift to grab timecodes (only needed for Q4 Pro)
Workflow options
Wincaps Q4 offers various workflow options for subtitle origination depending on your preference and requirements for:
-
Transcription – using imported script, system keyboard or respeaking
-
Timecoding – manually subtitle by subtitle, aligned section-by-section, or Fixed during replay
-
Translation – whether the subtitles are in the same language as the audio track
The chosen workflow will depend on the type of programme being subtitled, whether working interlingually or intralingually, whether the subtitle language is supported by a speech recognition system (English, French, Italian, Spanish, German, Dutch) and/or (for intralingual work) the aligner (add Swedish and Romanian to the previous list). The recommendations below may be helpful in making the choice:
Intralingual subtitling
If an accurate script is available then use the Script Extractor tool to quickly separate dialogue from other script content and import it into Q4 in preference to transcribing. If a transcript has to be produced, respeaking (Wincaps Q4 Pro only) is generally quicker than retyping.
If the programme audio has reasonable runs of clear dialogue and is free from invasive sound effects, and the language is supported, use the Aligner (Wincaps Q4 Pro only) for section-by-section timecoding – regardless of transcription method.
If the audio is not suitable for alignment, consider using Fix Mode timecoding during a replay pass, otherwise if no other option is suitable enter text and grab timecodes manually on a subtitle-by-subtitle basis.
Translation subtitling
If you are creating a “master file” in the same language as the soundtrack, use one of the workflows above. If the subtitles are being translated as originated, a subtitle-by-subtitle workflow with manual timecode grabbing is probably best.
Regardless of the chosen workflow, Q4 can be configured to provide productivity assistance in the following ways:
-
Formatting and segmenting text (Text Splitting)
-
Adjusting timecodes to take account of shot changes, gaps and durations (Timing Rules)
-
Automatic colouring (Speaker List)
Template, Text Splitting and Timing Rules need to be configured before the full productivity benefits will be achieved. See the associated links.
Timing Rules
When a timecode is grabbed manually or is generated automatically by text-to-speech alignment, Wincaps Q4 can run this timecode through a set of rules to try to optimise its relationship to shot changes and adjacent subtitles. These Timing Rules are normally stored as part of the default template for the customer and so will be loaded automatically if the correct customer is selected when the job is started.
The Timing Rules can be set up or overridden for a specific file by opening the dialogue and making changes to any default values that are present. To access the Timing Rules dialogue, select the Info tab in the Toolbox and choose the File Info tab from that section. The Timing rules button is in the top row as shown below:
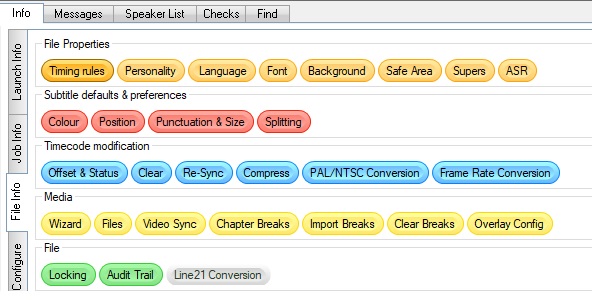
Click the button and the dialogue will appear: Enter the following values as a starting point.
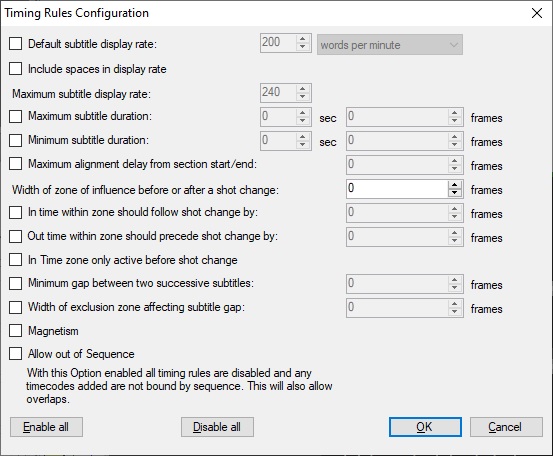
Each rule can be enabled or disabled using the tick to the left of the title of the rule: Enable all and Disable all switch on or off all the ticks.
Default subtitle display rate sets the target rate in words per minute of characters per second/minute: the ideal display time can be changed according to the timing of surrounding subtitles.
Maximum subtitle display rate affects the size of the percentage steps between green (OK), yellow, orange and red (too fast) in the colour background to the reading rate display in each subtitle.
Maximum subtitle duration and Minimum subtitle duration are applied after the target rate has been calculated.
Maximum alignment delay from section start/end defines the amount that an automatic alignment can drift from the markers which set the start and end times for the aligned sequence. For more detail see the topic on Using the Aligner.
Width of zone of influence before or after a shot change defines the distance over which a shot change will exert a “snap to” pull on the In or Out time of a nearby subtitle.
Two values allow the In time to follow or the Out time to precede a shot change which causes the edge to snap to it.
The Minimum gap between two successive subtitles corrects the timecodes to ensure that the specified number of clear frames are left between subtitles when they are adjacent. The Width of exclusion zone affecting this gap defines the gap which is not allowed - i.e. either the gap is the fixed minimum value or it is greater than the exclusion value.
The rules also incorporate implicitly the concept of magnetism: Two subtitles which are separated by the minimum gap behave as if they are magnetised, so within reason if the Out time of the first or the In time of the second is changed, the other follows it and maintains the same spacing.
Application of the Timing Rules
The Timing Rules are designed to summarise all of the various “pulls” on a timecode based on its relationship to shot changes, other subtitles, and the effect on reading speed and duration. The rules are applied every time a subtitle timecode is changed, other than when that change is signalled as being explicit (i.e. it overrides the rules) or an offset is being applied. So if the Aligner creates timecodes based just on speech alignment, they are then run through the Timing Rules. If you grab a timecode or click and drag a subtitle or one of its edges in the Timeline View, the change will be run through the Timing Rules unless you hold down the Ctrl key to signify it as being explicit. If you type in a timecode value, or nudge an existing value, it will be regarded as an explicit change and not subject to the rules.
Because there are a number of possibly competing factors involved, the Timing Rules are applied in sequence and the end result is often a compromise between different parameters. It is not of course mandatory to have all the rules enabled, and you can if you wish restrict the items which are in play. Using the suggested starting values, see Timing Rules Example Narrative for an explanation of how the parameters are applied.
Using the Aligner (Q4 Pro only)
The Aligner can significantly reduce subtitle preparation time for suitable programme material. Generally this is material which contains reasonably clear dialogue without invasive music and effects, where fairly uninterrupted runs of dialogue stretching to say 6-12 utterances are routinely achieved. If there are isolated sections where speech is difficult to distinguish from noise, these can be timed manually.
You can use the Aligner to assist with timecoding any sequence of subtitle texts, be they from a script import, typed from the keyboard, generated by speech recognition or transcribed by Stenograph. The principle is the same in all cases:
-
Identify a reasonably clear run of dialogue without long pauses (greater than 2-3 sec) and without significant invasive noise
-
Create or identify the corresponding subtitle texts
-
Mark the start and end of the dialogue at the start and end of the corresponding text sequence
The run of dialogue and text identified for alignment is called a section. Keystrokes or voice commands can be used to define the start and end of a section, these section markers are stored in the file and shown on the screen. You should always use the List View when working with the Aligner.
Originating text and aligning
If you are originating the text and aligning subtitles section-by-section, it is recommended to configure the Numpad Ins/Del keys pressed alone to control the section start/end marking. Set the current subtitle position to be the last subtitle in the file, and then the workflow is as follows:
Play the media until you identify the start of the next sequence of dialogue, then jump back and pause on or just before the start of speech - the position need not be exact. The green blocks in the media timeline give you a cue by showing when the next speech segment begins.
If you are originating from the keyboard, press the section start key, or if you are respeaking, say your chosen “section start” command. Either way, because you were on the last subtitle, the system will create a new subtitle and a cyan “section start” marker will appear at the current timecode. You can then type in or respeak the text. The display will be similar to that shown below:
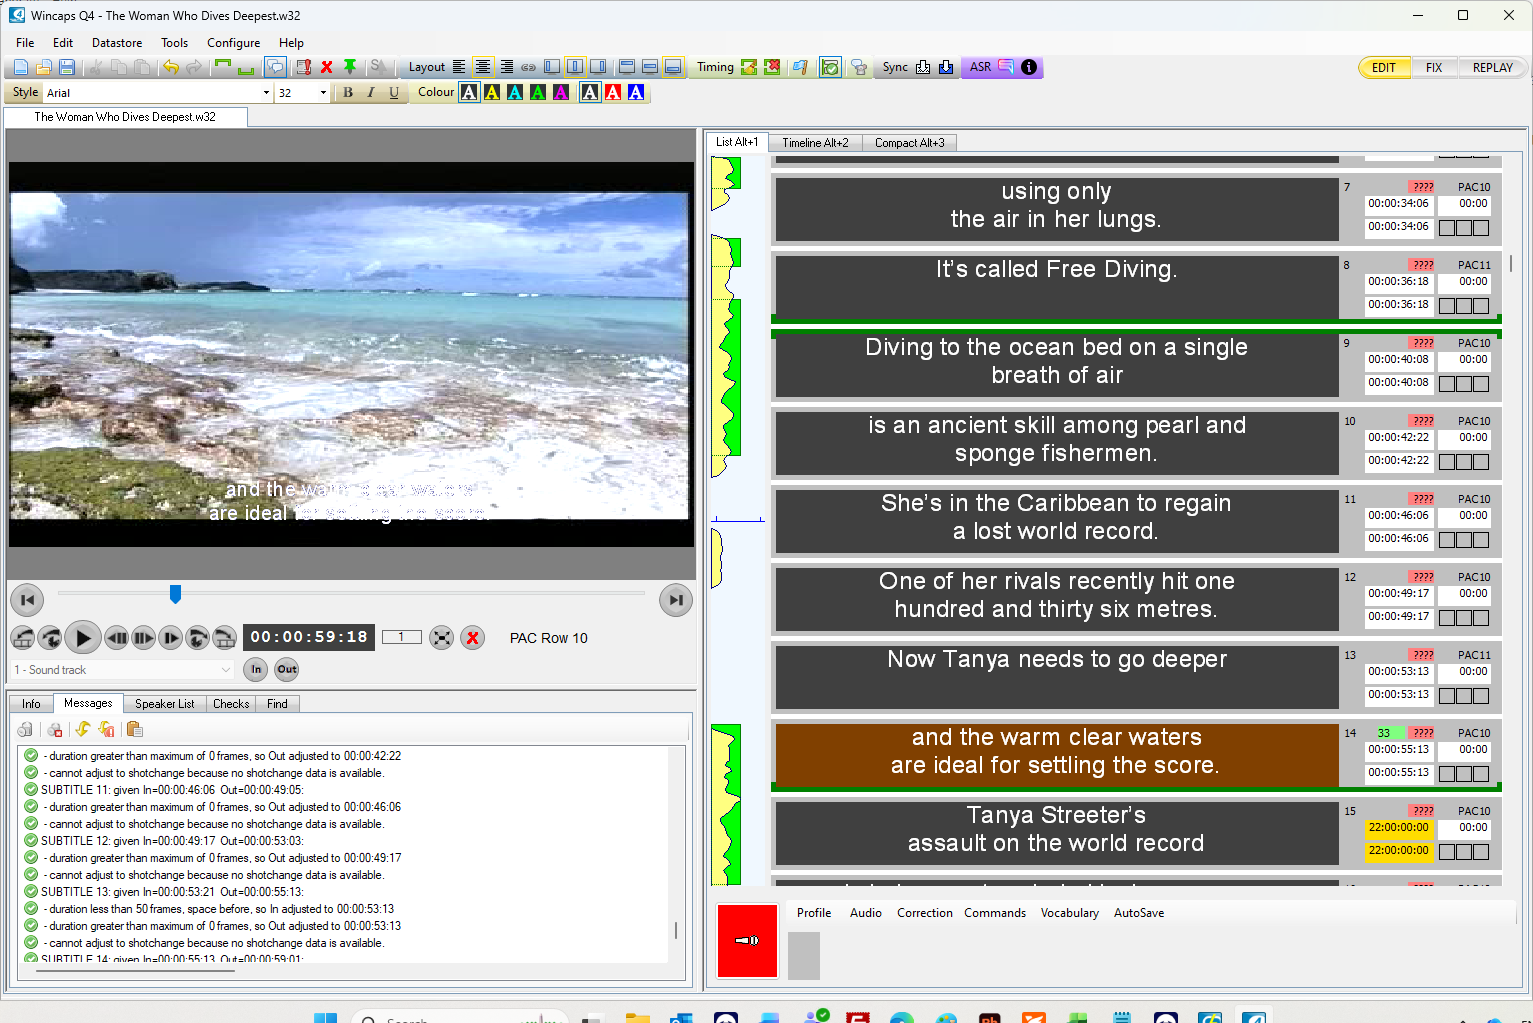
Note that this screen shot has been produced while respeaking via the SpeakTitle input window - there is no need to segment into separate subtitles unless you wish to, since the system will do this automatically using the text-splitting rules. If you are originating from the keyboard, you can either type into SpeakTitle window if you want automated text-splitting to occur or you can enter the text directly into subtitles. In both cases, automatic text splitting needs to be enabled via the ![]() button located on the file toolbar.
button located on the file toolbar.
When the run of dialogue reaches a gap, or after about 12-16 subtitles as a sensible maximum, pause the media just after the end of the final utterance, and with the current subtitle being the last in the sequence. If you are working in the SpeakTitle window, press Return to ensure the last sequence has been split. Then press the Section End key or respeak the “section end” command.
This adds an end marker to the previous non-blank subtitle (Section End normally works on the current subtitle but there is a special case where the current subtitle is blank and is the last in the file). The Aligner then runs, and when it finishes the section markers will be green (success) or yellow (fallback timecodes were calculated).
At this point you would then continue the process for the next speech segment. Remember that once the Aligner starts to run (section markers turn mauve) you do not need to wait for it to finish before you carry on with the creation of the next section.
Switching to the Timeline View in the above example we can see how the Timing Rules have been applied in order to conform the speech-aligned texts to the presentation style you wish to achieve.
![]() See the example of the Timing Rules narrative with explanations
See the example of the Timing Rules narrative with explanations